
Cement Nails: The Invisible Cornerstone of Construction & Complete Guide to Selection and Use

In construction, home decoration, and even daily maintenance, cement nails are seemingly ordinary yet indispensable fasteners. With strong penetrating power and firm adhesion, they have become the key link connecting building materials to hard substrates such as concrete and brick walls. From the structural construction of high-rise buildings to the installation of wall hangings in homes, cement nails always play an irreplaceable role. Today, we take an in-depth look at cement nails, covering their core features, classifications, selection, and usage tips to fully unlock this small hardware tool.
I. Core Features of Cement Nails: Why They Provide Stable Fixing
The biggest difference between cement nails and ordinary iron nails lies in their unique materials and craftsmanship. Ordinary iron nails are mostly made of common carbon steel with limited hardness and cannot easily penetrate hard substrates like concrete or brick walls. Cement nails, however, are designed specifically for hard materials.
High-strength material: Cement nails are usually made of high-carbon steel (such as 45# or 60# steel), produced through multiple processes including cold forging and heat treatment. Their hardness is far higher than ordinary iron nails. The surface is often treated with blackening, galvanizing, or carburizing to further improve rust and corrosion resistance, making them suitable for outdoor and humid environments.
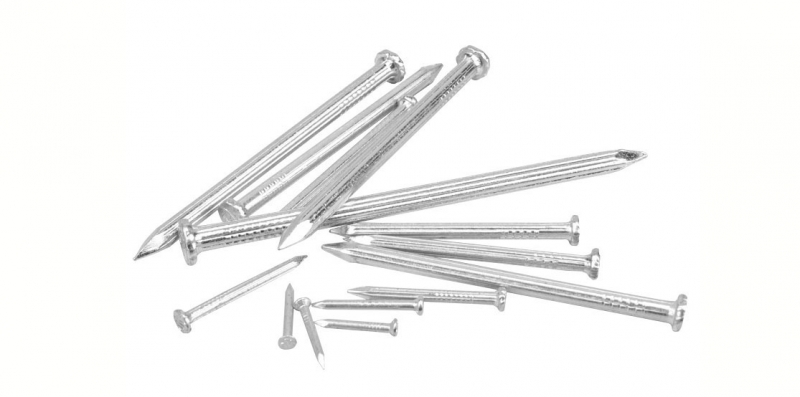
Special shank design: Most shanks are threaded or spiral, which greatly increases friction with the cement base compared to smooth shanks and prevents loosening. The nail head is usually flat for easy hammering and reduces damage to the wall.
Strong penetrating power: Quenched cement nails have sharp, high-hardness tips that easily penetrate concrete, red bricks, cement floors, and other hard substrates, gripping firmly to provide stable support for fixtures.
II. Common Types of Cement Nails: Choose the Right Type for Better Results
Cement nails come in various types and specifications for different scenarios. Choosing the right size ensures better performance.
| Classification | Type | Application |
|---|---|---|
| By shank type | Straight shank cement nail | Light-duty fixing, such as small decorative panels and small hangers |
| Threaded cement nail | Heavy-duty fixing, such as pipes, furniture, and building components; not easy to loosen | |
| Steel cement nail | Higher hardness and thicker shank for heavy equipment and steel structures; stronger penetration | |
| By length | Small (15–30mm) | Household use: photo frames, shelves, small hardware |
| Medium (30–60mm) | Decoration: keels, gypsum boards, electrical conduits | |
| Large (over 60mm) | Construction: steel structures, formwork, large building components | |
| By coating | Black cement nail | Basic rust resistance; indoor dry areas, low cost |
| Galvanized cement nail | Excellent rust and corrosion resistance; outdoor, balcony, garden, and humid areas |
III. Tips for Buying Cement Nails
The quality of cement nails on the market varies. Focus on these points when purchasing:
Check material and hardness: High-quality cement nails produce a clear sound when struck and do not bend easily. Inferior nails are soft, deform easily, and lack penetration.
Inspect appearance and craftsmanship: Qualified cement nails have a smooth surface, uniform threads, sharp points, and flat heads. Avoid rusty, coated, or poorly formed products.
Match specifications to usage: The length of the cement nail should be 2–3 times the thickness of the object being fixed, with at least 15–20mm embedded in the base for stability.
Choose reliable brands: Select products with formal production qualifications and quality certifications such as ISO to ensure safety and performance.
IV. Usage Tips: Safe, Efficient, and Wall-Friendly
Improper use can damage walls, break nails, or result in poor fixing. Follow these tips:
Locate accurately and avoid hollow areas: Mark positions before installation. Avoid hollow areas, as nails cannot hold firmly there.
Correct angle and force: Hammer vertically with even force. Avoid angled strikes, which bend nails or break points.
Use proper tools: For large-scale or heavy-duty jobs, use a nail gun. For extremely hard walls, drill a small pilot hole first to prevent the tip from breaking.
Safety protection: Wear safety goggles to avoid flying debris.
V. Maintenance and Precautions
Storage: Keep in a dry, ventilated place to prevent rust. Sort by size for easy access.
Limitations: Do not use for flammable or explosive materials or overloaded heavy objects.
Removal: Use pliers to pull out gently. For rusted nails, apply rust remover first.
Alternatives: For fragile surfaces like tile or marble, use nail-free glue or expansion bolts instead.
Cement nails are small but vital components in hardware and construction. From major projects to home improvement, they are everywhere. Understanding their features, types, and proper use helps you work more efficiently and ensure every connection is strong and durable.

 Send Email